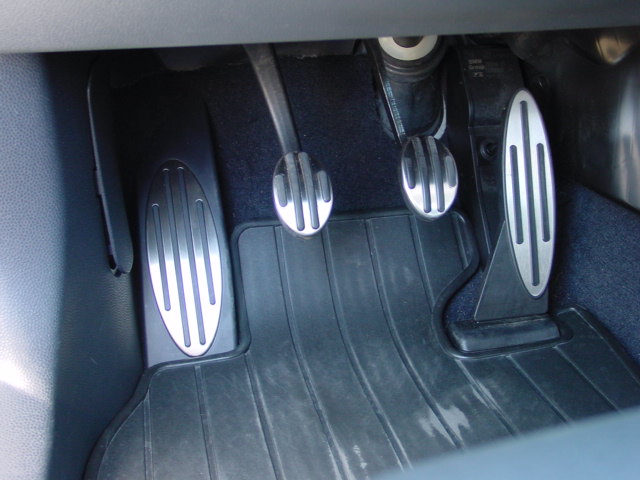
Starting with 2002 week 48 builds, Cooper S models were fitted with accelerator, brake and clutch pedals to match the existing alloy dead pedal. Many owners of earlier built Cooper S models upgraded their rubber pedals. Soon an alloy pedal retrofit kit became available for Cooper and One models.
Parts Diagram and List[]
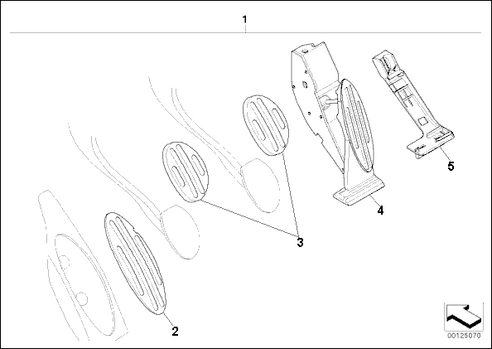
No Description Supplement Qty Part No 1 Pedal Set (Manual Transmission) 1 35410153602 2 Foot Rest Insert 1 [1] 3 Brake / Clutch Pedal Cover 2 [1] 4 Accelerator Pedal Module 1 [1] 5 Adapter Plate 1 [1]
- [1] Included with Pedal Set (1)
Fitting Instructions[]
Foot Rest Insert (2)
- Remove the rubber insert by prying it out with a small screwdriver.
- Pop the alloy insert in the foot rest.
Brake and Clutch Pedal Covers (3)
- Remove the old rubber pedal covers by starting from the bottom and peeling them off the brake and clutch pedals.
- The side and bottom edges of the rubber backside of the alloy pedal cover form a "horseshoe". At the open end of this "horseshoe" is a "lip" with MINI embossed on it.

Slide the "lip" of the alloy pedal cover over the top edge of the pedal and then work your way down wrapping the "horseshoe" edges around the sides and bottom of the pedal.

Accelerator Pedal Module (4) and Adapter Plate (5)
- Make sure the ignition is off.
- Press down the retaining tab (1 below) and remove the old accelerator pedal module from the adapter plate by sliding it to the left.

- Detach the plug connector (2 above).
- Remove the mounting screw (1 below).

- Press both retaining tabs (2 above) and remove the old adapter plate.
- Perform the steps 2 though 5 above in reverse order to fit the new adapter plate and alloy accelerator pedal module.